Interior design tips
When it comes to enhancing your interior 3D renders, there are several tips and techniques that can help you achieve stunning results.
Sydney based architectural visualization studio Cleanpix Graphics shares some tips that will help all artists of any skill level to take their interior 3D rendering projects to the next level.
Composition & Lighting
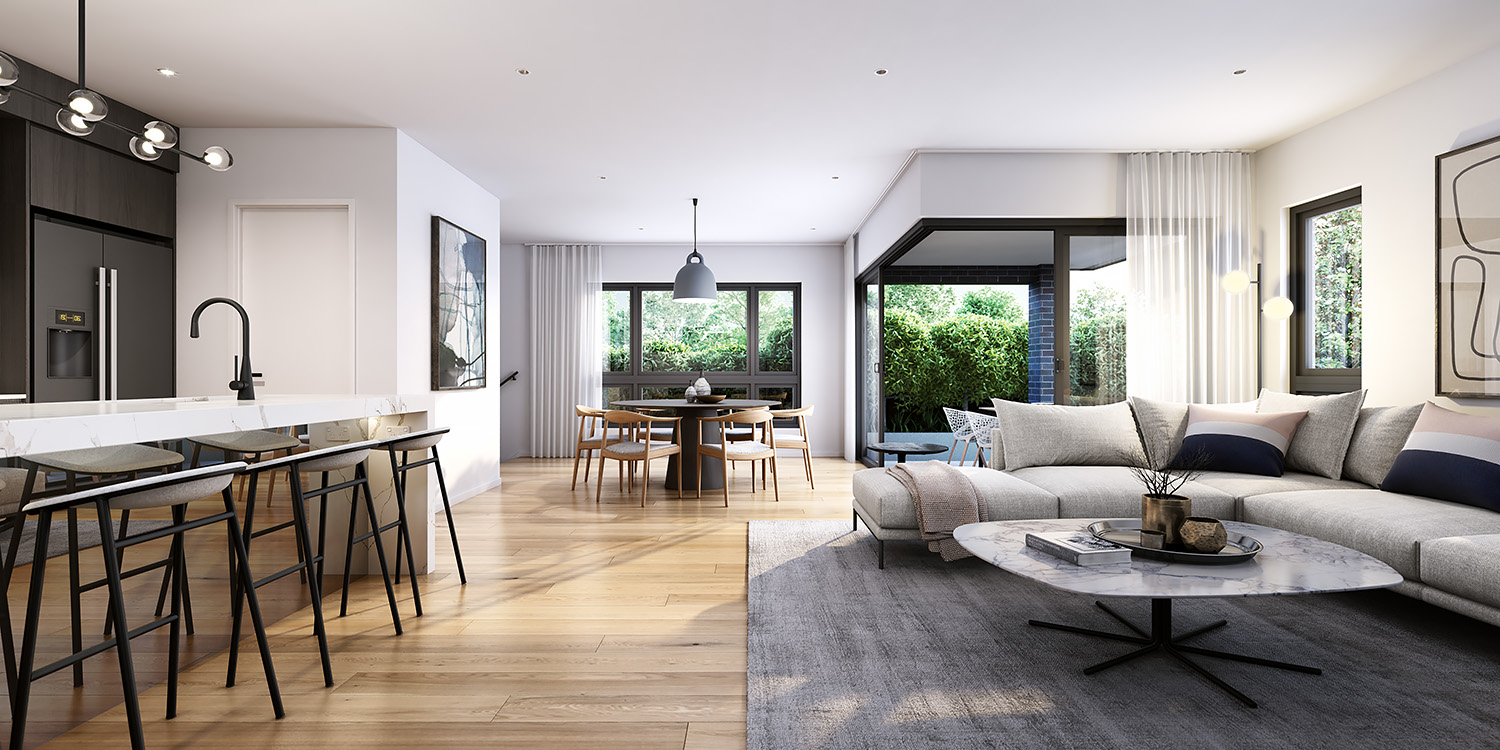
One important aspect of interior design is to choose a focal point for your space, the composition of your 3D renders is crucial in creating a balanced and visually pleasing image. This can be a piece of furniture, a bold color, or even a unique architectural feature. The focal point will draw the viewer’s attention and create a sense of harmony within the room.
Avoid placing the camera at eye level as it may result in flat and uninteresting images. Placing the camera closer to the floor in any interior scene will help the space look bigger, which can be especially helpful when visualizing crampt space like bathrooms or tiny apartment living rooms. Consider using a wide-angle lens to capture a wider field of view and create a further perception of spaciousness to your renders. Be mindful of going too wide however, as you want to avoid seeing obvious lens distortion, creating a ‘fish eye’ effect.
Consider the rule of thirds, where you divide the space into nine equal parts and place your main elements on the intersecting points. This will create a more dynamic and engaging composition. Also, make use of leading lines and different perspectives to guide the viewer’s eye through the space. One example of this could be to ensure that the timber floor boards of an internal space are running length-wise in the direction the camera is looking. This would aid in creating a feeling of space and movement, rather than having the boards placed perpendicular to the camera’s view point, like hurdles on a running track.
Lighting plays a crucial role in any interior design project. Experiment with different types of lighting setups such as natural light, artificial light, or a mixture of both to create the desired mood and atmosphere in your renders. Sometimes this decision will be determined by the architectural design. When visualizing an interior with relatively few or fairly small windows, you may be forced to rely more on using an artificial light setup in order to get an evenly lit interior that does not seem to dark and gloomy.
If the interior design of your 3d model features some unique light fixtures such as sconce lights in a hallway or pendant lights in the kitchen, it is often worth-while to show them turned on to draw attention to these elements.
Quality Textures and Materials
Textures and materials can transform a plain and boring space into a visually interesting and inviting one. Make use of realistic materials like wood, glass, metal or fabric to bring life to your design.
Use high resolution textures that accurately represent the materials you are trying to depict. Pay attention to details such as bumps, scratches and imperfections, as they can add character and authenticity to your models. Try to avoid obvious repetition or ’tiling’ of the texture to achieve a more photo-realistic result.
If working to an interior designer’s specification, it is vital to match their supplied swatches as closely as possible to avoid having to make costly revisions to your artwork in the closing stages of the project.
Colors can have a significant impact on the mood and ambiance of a space. Experiment with different color schemes to achieve the desired effect in your 3D renders. You can opt for a neutral color scheme for a sleek and modern look, or mix bold and vibrant colors for a more energetic and lively atmosphere.
Consider the impact that the colors will have on the overall lighting of your interior space. As an example, selecting a dark carpet or floor boards will signficantly darken the general mood of your image as this color will bounce off on to your walls and ceiling, making them look a bit more dirty and grey. By contrast selecting a light or warm colored floor finish will help to bounce the light and colour up towards the ceiling, creating a lighter feeling at the top of the image.
General 3D Rendering Tips & Tricks
Aside from the interior design tips, there are also specific 3D rendering techniques that can help enhance the quality of your renders, achieving a more photo-realistic result.
Adding realistic details to your 3D renders can help bring them to life. This can include elements such as plants, books, or other decorative objects that you would typically find in a real space. Care should be taken to ensure these elemnts blend seamlessly with the overall design without making your interior space appearing too cluttered and messy.
Accurate measurements are essential when creating 3D models of interior spaces. Take the time to measure the dimensions of the room, furniture pieces and other elements like joinery, balustrades, glass thickness and fittings.
Pay attention to elements such as light switches, doorknobs, and other small fixtures that can add realism and authenticity to your designs. These details may seem insignificant, but they contribute to creating a more immersive and believable space.
Reference images can provide valuable guidance and inspiration during the 3D modeling process. Gather reference images that showcase the style and features you want to replicate in your renders. These images can help you understand the proportions, materials, and overall design elements of the space.
Depth of field is a great technique for directing the viewer’s attention to a specific area or object in your 3D visualizations. By selectively focusing on a particular element and blurring the background, you can create a sense of depth and draw attention to the important details in your design. Experiment with different focus distances and aperture settings to achieve the desired effect.
Post Production
After rendering your 3D images, post-processing and color correction can significantly enhance the final result. Use photo editing software to adjust the brightness, contrast, saturation, and overall color balance of your renders. This will allow you to fine-tune the mood and atmosphere of the space and create a more visually stunning image. Color correcting different elements of your interior 3D render for a closer match to certain finishes can also help you save time as small adjustments can be made infinitely faster in a software like Photoshop, rather than having to re-render your 3D model multiple times.
When outputting your interior renders from the 3D software, you may need to save out some additional render ‘passes’ that will make the selection of certain elements in your images quicker and easier during the post phase. This can often be achieved by assigning material or object IDs to different parts of your 3D model prior to rendering.
Conclusion
By following these interior design tips and 3D rendering techniques while utilizing efficient 3D modeling practices, you can enhance your interior visualizations and create stunning life-like representations of your designs. Remember to experiment, practice, and continue learning to refine your skills and achieve the best possible results.